
Do you want to learn How To Install WordPress On Localhost Using XAMPP?
It makes it easier to test plugins and themes, as well as learn how to develop WordPress themes, by installing WordPress on your computer.
We will show you how to easily set up a local WordPress site with XAMPP in the following article.
Table of Contents
What are the benefits of creating a local WordPress site?
Many developers and site owners create local WordPress sites. They do it so they can test WordPress without having to build an online website.
You can only view local websites on your computer. It is possible to test and learn about different WordPress themes and plugins. The best way to test out new plugin updates is to create a local copy of your website on your computer before implementing them on your live site.
You will only be able to see local websites on your computer. You will need a domain name and WordPress hosting if you intend to make a live website.
Let’s take a look at how to install WordPress locally using XAMPP on Windows, Mac, or Linux.
What is XAMPP?

XAMPP stands for cross-platform, Apache, MySQL, PHP, and Perl, and it allows you to create a WordPress site on your computer’s local web server. The “cross-platform” component refers to the fact that this simple and lightweight solution works on Windows, Linux, and Mac.
You can install XAMPP on your PC to set up a local server environment. You need to install a web server (Apache) on your computer, PHP, and MySQL in order to set up a local WordPress site.
Database management systems like MySQL and PHP are both programming languages. In order to run WordPress, they are required.
For beginners, installing each separately can be quite challenging. XAMPP simplifies the process. Local WordPress websites can be built with XAMPP. Mac, Linux, and Windows computers can all use the program.
Set up XAMPP so that you can run your WordPress site locally by installing it and configuring it.
How to Install XAMPP?
In order to download XAMPP, you must first visit the XAMPP website and click the appropriate download button. Installer and application interfaces may differ based on your operating system.
As a convenience, we’ll demonstrate the Windows version in this article.
After you download XAMPP, you will need to run the installer.
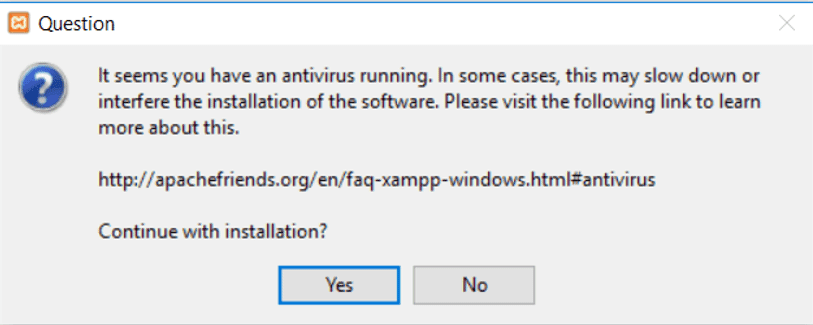
You are asked where to install XAMPP and which packages you would like.
Most users will be fine with the default settings. Click ‘Next’ again to complete the installation process.izard.
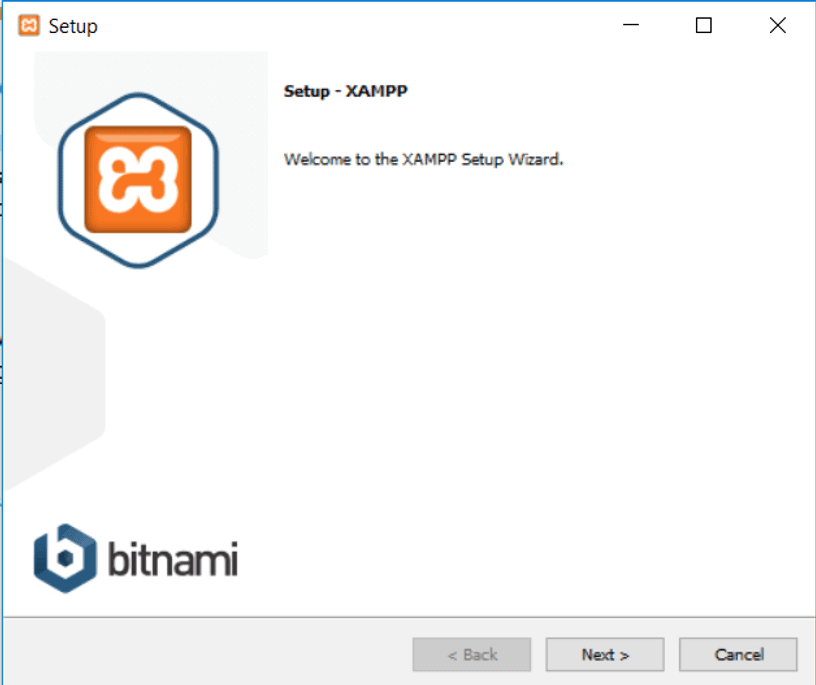
Click on the finish button when you have finished the wizard, and then check the option ‘start the control panel now’. The XAMPP control panel will be launched.
Through the XAMPP app, you can use Apache web server and MySQL database server on your local machine. Click on the start buttons for Apache and MySQL.
Apache and MySQL will now be started by XAMPP. In order to run both applications, you need to click on the ‘Allow Access’ button in your firewall notification.
Each application’s name will appear in green as soon as it is started. It is now time to install WordPress using XAMPP on a local server.
Using XAMPP to build a WordPress site locally
Installing WordPress is the first step. You can download WordPress by visiting WordPress.org and clicking on the ‘Download WordPress’ button.
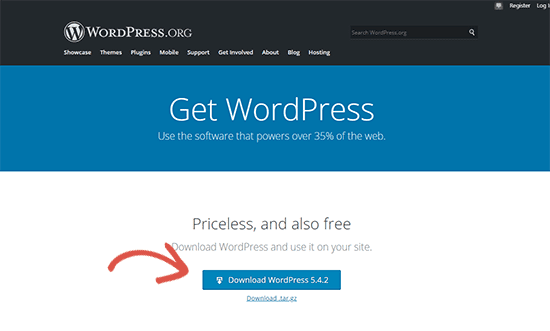
Extraction of the zip file reveals the WordPress directory after downloading WordPress. This folder needs to be copied.
Next, go to the folder where you installed XAMPP.
Under Windows, you would find it in C:/Program Files/XAMPP/htdocs or C:/XAMPP/htdocs. On Mac, you will find it in the /Applications/XAMPP/htdocs folder.
Place the wordpress folder into the htdocs folder that you previously copied. The WordPress folder should be renamed website or whatever you like. It will make your local site easier to identify.
To begin, open your favourite web browser and type the following address in the address bar.
Enter the Web address: https://localhost/website1/
Now, Change website1 with the name of your own folder if you renamed the WordPress folder.
You will be asked to choose a language once the WordPress installation wizard is loaded. Click the ‘Continue’ button after selecting a language.
The next screen will display a message indicating that WordPress needs a database name, a database username, and a password.
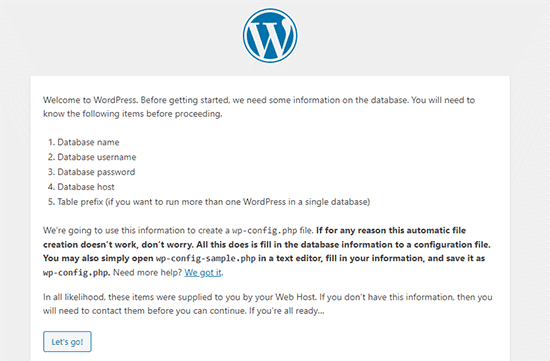
Let’s set up a WordPress database.
Go to https://localhost/phpmyadmin/ and open a new browser tab. XAMPP comes with a pre-installed version of phpMyAdmin. The interface is simpler and makes database management easy.
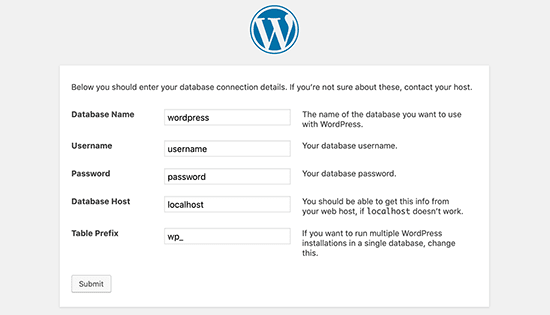
Choose Databases, and give your new database a name. Click Create to proceed. You can use your newly created database for your WordPress site now that you have created it.
Click on the ‘Let’s Go’ button and switch back to /localhost/website1. The next screen will ask you for information about your WordPress database.
Your previously created database name should appear here. Leave the password field blank and enter the root as the username. Your database host must be localhost.
Please click ‘Submit’ when you are done.
WordPress now stores these settings in the WordPress configuration file wp-config.php if you are using Windows or Linux. You will be prompted to create it, however, if you are on a Mac.
This file should be created in the root folder of your website. Paste the copied text into the file after creating it. Once the file is saved, you should return it to the WordPress installer to complete the installation.
After you fill out the following form, WordPress will ask you for information about your website. Firstly, choose a title for your website.
Your administrator account requires you to enter a username, password, and email address. You can continue by clicking on the ‘Install WordPress’ button once all the information has been filled out.
The installation will now run and you will be prompted to log in once it is complete.
By going to /localhost/website1/wp-admin, you can log into your website by entering your username and password as you did during installation.
What to do after creating a local host WordPress site?
Now that your WordPress site has been created locally using XAMPP, you can work on it as if it were a live site.
You can change the appearance of your site or install a new theme via the Appearance menu located in the WordPress admin sidebar. Next, you should check out WordPress plugins.
Plugins add cool features like contact forms, social media buttons, eCommerce stores, etc. to your WordPress site.
To begin blogging or building a website with WordPress, you will probably want to move your local WordPress site to a live server.
For that, you will need a domain name and a web hosting account. You can get any of the domain and reliable hosting provider.
Conclusion: How To Install WordPress On Localhost Using XAMPP?
With this article, we hope you learned how to set up a WordPress site locally with XAMPP. On Windows you can use Wampserver to set up WordPress sites, and on Mac you can use MAMP to set up WordPress sites.
![How To Manage Client Communication Effectively 2024? [5 Key Tips]](https://megablogging.org/wp-content/uploads/2022/11/Client-Communication-Management-211x150.png)
![How to Create a Lead Capture Landing Page in WordPress 2024? [Step-By-Step Guide]](https://megablogging.org/wp-content/uploads/2022/11/How-to-Create-a-Lead-Capture-Landing-Page-in-WordPress-211x150.png)
