WordPress is a popular content management system that powers millions of websites. One of the reasons for its popularity is the vast number of plugins available for it.
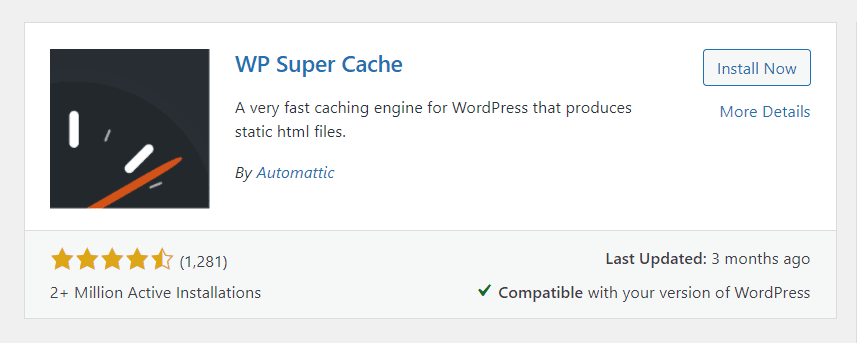
WP Super Cache is one of those plugins and it can help speed up your website by caching your pages and posts. In this tutorial, we will show you how to install and configure WP Super Cache.
If you are looking for a way to speed up your WordPress site, then you should take a look at the WP Super Cache plugin. This plugin can help to reduce the load time of your pages, which can lead to better user experience and higher search engine rankings.
In this article, we will show you how to install and configure WP Super Cache on your WordPress site.
If you’re looking for an easy way to speed up your WordPress site, the WP Super Cache plugin is a great option. In this tutorial, we’ll show you how to install and configure WP Super Cache. We’ll also cover some of the plugin’s features and benefits. Let’s get started!
If you want your blog or website to run as smoothly as possible then it’s important that you have caching in place. This will make your site more responsive and faster loading for returning visitors – something they will definitely appreciate.
The WP Super Cache WordPress Plugin is one of the easiest caching plugins to use and it can really speed up your website, so let’s take a look at how to set it up.
If you’re looking for a quick and easy way to speed up your WordPress site, the WP Super Cache plugin is a great option. In this tutorial, we’ll show you how to install and configure WP Super Cache. We’ll also give you some tips for getting the most out of this powerful plugin.
Table of Contents
Steps To Install And Configure WP Super Cache WordPress Plugin-
- Once you have downloaded the WP Super Cache plugin, go to your WordPress site’s plugins dashboard and click on “Add New”.

- Type “WP Super Cache” into the search bar and hit enter.

- The first result should be the WP Super Cache plugin. Click on “Install Now” and then “Activate”.
- Once the plugin is activated, you will see a new menu item in your WordPress site’s sidebar called “Super Cache”. Click on this and then click on the “Settings” tab.
- The first setting you will see is “Cache Status”. This setting should be set to “Enabled”.
- Below this setting you will see a list of “Cache Modes”. For most people, the “Simple” cache mode will work best. However, if you are experiencing issues with your site caching properly, you can try using one of the other modes.
- The next setting is “Compression”. This setting should be enabled. Doing so will save space on your server and should speed up your site as well.
- The next setting is “Cache Timeout”. This setting can be set to anywhere from 5 minute intervals all the way up to 1 year. I would recommend you keep it at 8 hours, which is the default option.
- The next setting is “Minimum Cache Age”. This setting determines how long a page will stay in the cache before it is checked again to see if it needs to be updated. I would recommend you set this to “3600” (which is equal to 1 hour).
- The next setting is “Delete Expired Cached Files”. If you wish, you can set this to “Delete all cached files that were last modified more than ___ hours ago” and put in 3600 (1 hour) as the value. Doing so will free up space on your server once a day when WordPress checks for expired or out of date cached files which it doesn’t need anymore.
- The next setting is “Cache Preload”. This setting will tell WordPress to cache pages even if they have not been requested yet. I would recommend you leave this disabled.
- The next setting is “Edge Side Includes (ESI)”. This setting should be enabled if you are using a CDN or a caching plugin with WordPress. This will allow the plugin to use caching and ESI for your site and improve performance and speed.
- The next setting is “Admin Cache Preload”. This setting should also be enabled, but only if you are using a CDN or caching plugin with WordPress.
- You can now scroll down to the bottom of the “Super Cache” settings page, and you will see some additional options. The first option is called “Extra Super Cache Headers”. If you are using HTTPS on your site, then I would recommend that you enable this setting. Doing so will send an extra header to browsers which tells them not to cache certain elements of your WordPress site.

image credit- Pixabay - The next setting is called “Debug Mode”. This setting should be enabled if you are having any issues with your site caching properly. Doing so will provide more information about what is causing the issue.
- The final setting is called “Preload Mode”. This setting should be left disabled unless you are having issues with your site not caching properly.


Once you have configured the WP Super Cache plugin, your WordPress site will start caching pages and posts which will speed up your site significantly. If you are experiencing any issues with your site caching properly, I would recommend that you try using one of the other cache modes or enabling the “Debug Mode” setting.
What is a WordPress Plugin?
Most WordPress plugins are free, but there are also some premium (paid) plugins. Plugins can be installed in a few easy steps, either automatically through the WordPress admin interface or manually by downloading and uploading files to the server.
Some people consider plugins a security risk, but that can be avoided if you keep your plugins up-to-date and use common sense in choosing what to install and activate.

Dashboard warnings usually appear when a new plugin is installed or an update is available. You can also make use of our plugin management services to keep your site secure and up-to-date with the latest plugins.
Plugins allow adding features to a WordPress installation, such as contact forms, calendar feeds, SEO tools, social media integration and much more. There are thousands of free and paid plugins available that can be used to improve a WordPress site.
In order to install a plugin, you must first have a WordPress site installed and running. The plugins can be found in the WordPress Plugin Directory. Most of the plugins are free, but there are also some premium (paid) plugins available. You can install plugins automatically through the WordPress admin interface or manually by downloading and uploading files to the server.
When you install a plugin, make sure to keep it updated. Most plugins have updates available that fix security issues and add new features. You can check for updates by going to the Updates tab in the WordPress admin interface. If an update is available, click on the Update Now button to install it.

Quick Links
- How To Install And Activate WordPress Plugin To Your Blog
- WordPress Security Guide
- How To Add Facebook Send Button To WordPress & Blogger Blog
Conclusion- How To Install And Configure WP Super Cache WordPress Plugin 2024
WP Super Cache is a caching plugin for WordPress that improves your site’s performance by storing static HTML files of the pages you visit on your server. By limiting the number of queries to generate these files, it speeds up page load times and reduces bandwidth usage. It also caches every single post so visitors don’t have to wait for them to be generated each time they load a new one.
This can substantially improve performance when combined with other optimizations such as using an object cache or CDN service like Cloudflare or Amazon Web Services (AWS). For more information about how we can help optimize your site.
WP Super Cache is a WordPress plugin that caches your website’s HTML and CSS to reduce server load. This allows for faster page loading times, which can increase the number of visitors you get from search engine optimization (SEO) as well as improve user experience on your site.
You should install this plugin if you want to use an even better SEO strategy with less effort. If you successfully installed and configured it correctly, keep reading below! We will show you how to optimize settings within WP Super Cache so that it works optimally for your specific needs.